

You've got the classic front brake headache. The lever feels wrong, the bike is telling you something's off, and the temptation is to order a new pompa freno anteriore before you've proved the old one is guilty. That's the expensive mistake this guide is built to prevent.
A front brake pump, or master cylinder, doesn't create braking force on its own. It turns the motion at the lever into hydraulic pressure, then sends that pressure through the line to the caliper. If anything in that chain is weak, dirty, misadjusted, or full of air, the lever blame often lands on the pump even when the fault sits elsewhere.
Table of Contents
- A Spongy Lever on a Mountain Road
- Axial and Radial Pumps Compared
- Reading the Two-Number Code That Actually Matters
- How to Tell the Pump Is Actually the Problem
- Rebuild or Replace - The Maintenance Economics Question
- An Overview of the Bleed Procedure
- Choosing the Right Pump on Sixrace
- Frequently Asked Questions for Riders and Mechanics
A Spongy Lever on a Mountain Road
A rider rolls into the garage after a mountain ride and says the front brake pump is dead. The lever is soft, the bite point moved, and the bike doesn't feel safe. That diagnosis sounds clean, but in the workshop it's usually the start of the investigation, not the answer.
What the pump actually does
The front brake master cylinder is the hydraulic translator between your hand and the caliper. Your fingers move a lever, the lever pushes a piston, and that piston moves fluid through the circuit. The force multiplies because the fluid is confined, which is why a small hand input can clamp a disc hard at the wheel.
A useful way to think about it is a syringe. Push a small piston in one end and fluid moves through a sealed path to create work at the other end. In brake terms, that work is the caliper pistons pushing the pads against the disc.
Inside the pump, a few parts matter more than casual riders realise. The reservoir stores fluid, the primary seal and secondary seal keep pressure from leaking past the piston, the return spring brings the lever back, and the outlet port lets pressure move into the hose. If any of those pieces are compromised, the lever feel changes immediately.
Practical rule: a soft lever is a symptom, not a verdict. A bad hose, air in the line, sticky caliper pistons, or even lever pivot drag can all make the pump look guilty.
That's why a decent bleeding guide is useful before you start buying parts. A clean, methodical reference like the Rider 18 brake bleeding guide helps riders understand the fluid side of the job before they start replacing hardware.
The symptom and the system
The important thing is that the pump never works alone. It's part of a loop that includes fluid condition, hose health, caliper movement, and lever mechanics. When one part goes wrong, the whole front brake can feel vague, stiff, or inconsistent.
If the lever is spongy, the usual mistake is to call it a pump failure too soon. If the lever is hard but the bike still doesn't stop cleanly, the problem may be elsewhere in the circuit. If the lever sinks at rest, that points somewhere different again.
The pump is a hydraulic converter, not a standalone source of braking power. Once you keep that in mind, diagnosis gets much cleaner and parts orders get smaller.
Axial and Radial Pumps Compared
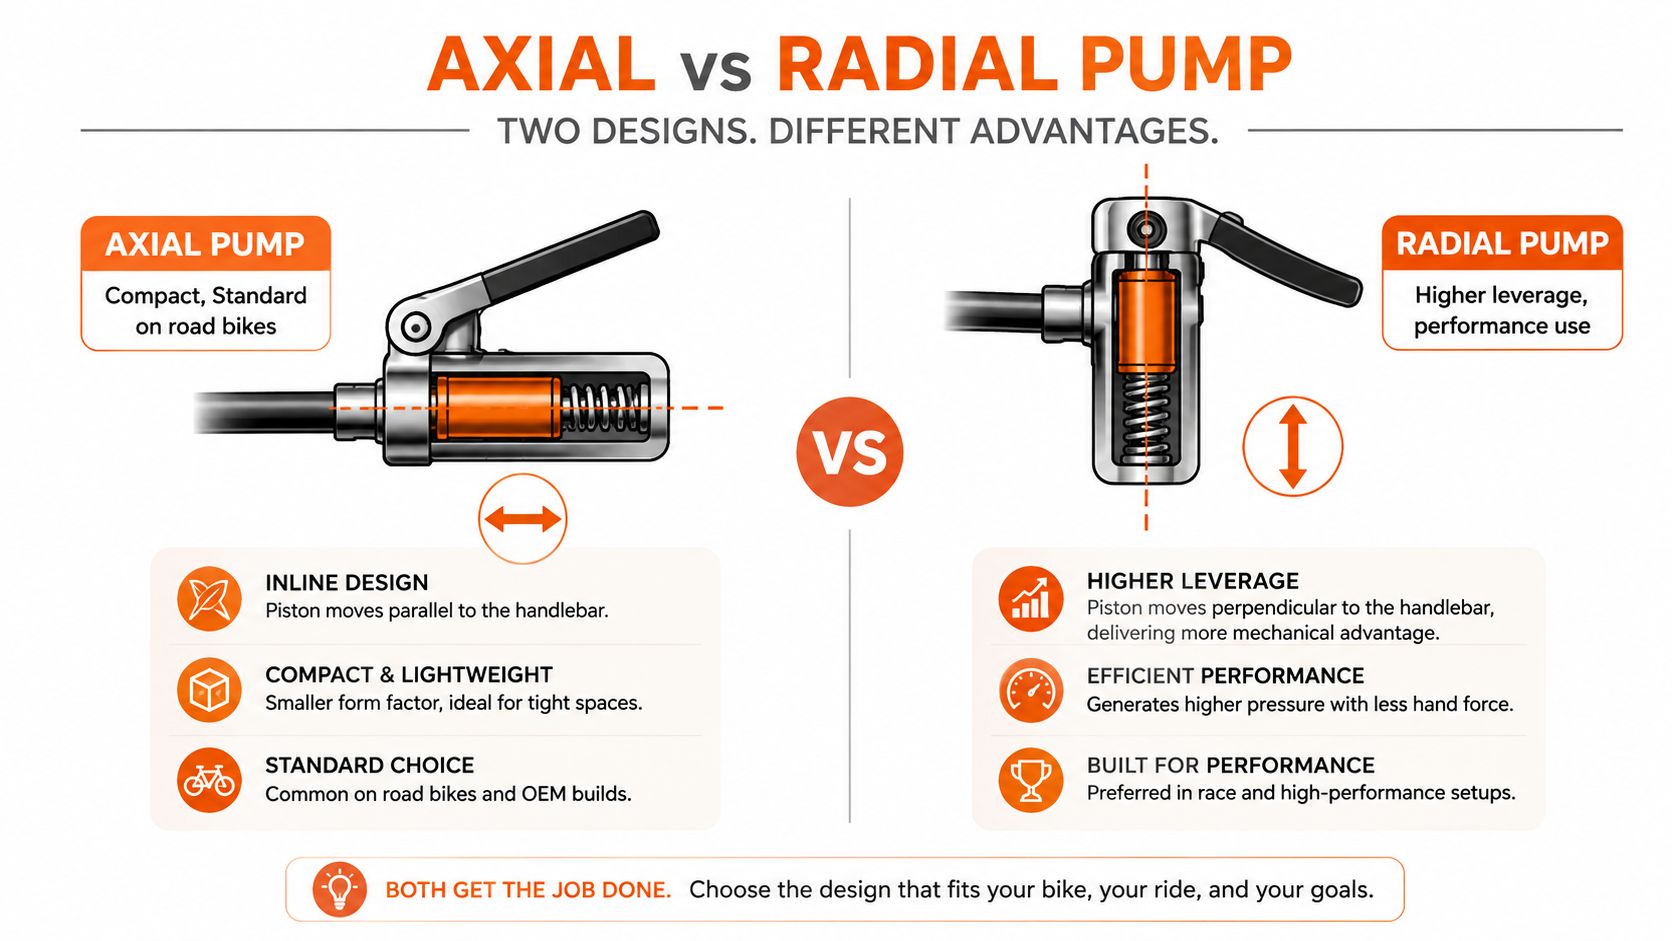
The two layouts you see most often are axial and radial. They do the same job, but the way they sit on the bar changes stiffness, feel, and fitment.
The basic difference
On an axial pump, the piston axis runs roughly parallel to the handlebar. That layout stays compact and fits well on many road bikes and mid-segment naked bikes. It's also the layout most riders have already used, so the hand feel seems familiar.
A radial pump mounts differently. The body sits against the bar, and the piston axis is arranged vertically relative to the handlebar. That design reduces flex under load and gives a more consistent lever feel when braking hard. Brembo's own history notes that the radial concept was patented in 1985, refined with further patents in 1988, and only reached a production motorcycle in 2002 on the Aprilia RSV 1000. That timeline matters because it shows how a now-common race-oriented part moved from patent to OEM adoption over nearly two decades, through Brembo's radial master cylinder history.
Radial doesn't automatically mean better for every rider. It means stiffer feel, cleaner response under heavy braking, and more performance-oriented packaging.
Fitment matters more than marketing
Switching from axial to radial is rarely a simple bolt-on decision. You have to check mounting bolt spacing, reservoir orientation, lever clearance, mirror clearance, and the way the hose routes from the bar to the fork. If those details are wrong, the upgrade can create more trouble than confidence.
A lot of aftermarket catalogues reflect this reality. A model-specific item such as Leve freno frizione Ducati Multistrada V4 S 2021+ Evotech-performance shows how fitment gets tied to year, platform, and part family rather than treated as universal hardware. That's the correct way to shop for brake controls.
In practice, the choice comes down to use case. Road bikes tolerate a friendlier, more compact axial setup. Track use, aggressive mountain riding, and heavy braking reward the stiffness and response of a radial layout.
Reading the Two-Number Code That Actually Matters
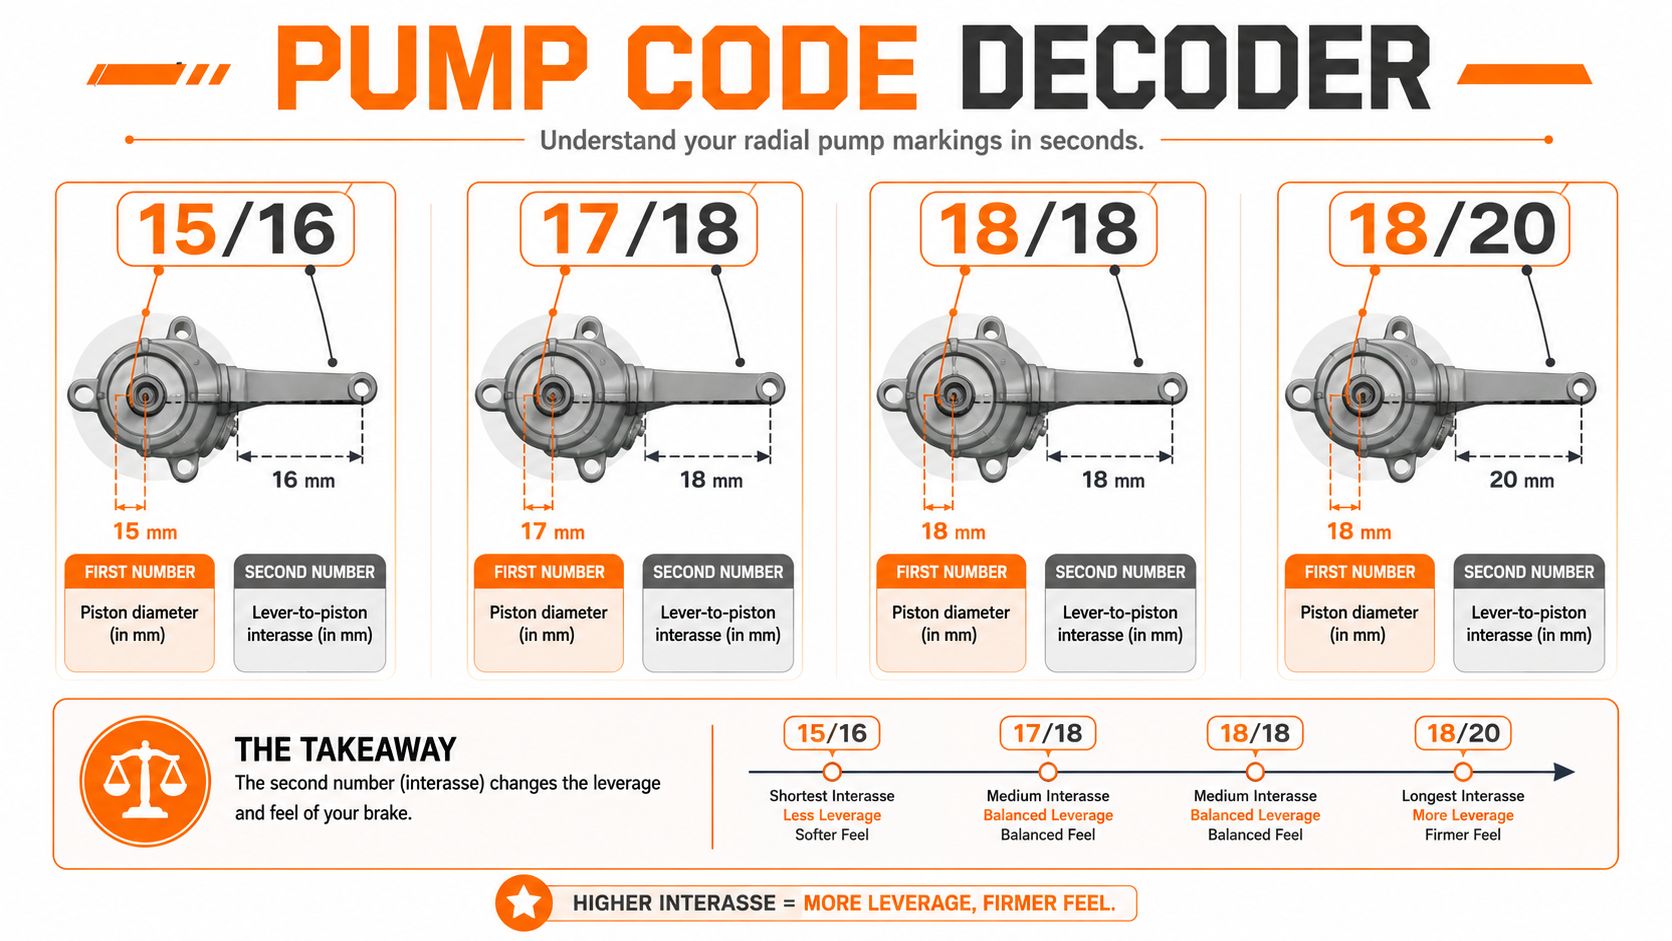
The code stamped on a radial pump isn't decoration. It tells you how the pump is built and how it will feel at the lever.
What the two numbers mean
The first number is the piston diameter in millimetres. The second number is the lever-to-piston ratio, often described as the interasse. Brembo lists radial front master cylinders with piston diameters of 15, 16, 17, and 18 mm in its product guidance, and that spread already tells you the hardware is tuned for different jobs, not one universal feel.
A smaller piston, combined with a shorter interasse, gives a sharper and harder lever with less travel. That's the kind of feel many riders want on track or during very aggressive road riding. A larger piston and longer interasse make the response more progressive and easier to modulate, which suits touring, two-up riding, and mixed-use bikes better.
How the feel changes in real life
An 18/18 setup is generally chosen when the rider wants a faster, more race-focused response. An 18/20 setup tends to feel smoother and more progressive. That difference isn't academic. It changes how much hand pressure you need before the pads bite and how much room you have to fine-tune braking at the limit.
Workshop note: if the lever feels too wooden for road use, the ratio may be too aggressive. If it feels long and vague, the setup may be too soft for the rider's pace or the bike's weight transfer.
The smart move is to match the code to the way the motorcycle is used, not to the most aggressive number you've heard about online. A commuter that sees wet roads, passengers, and traffic wants a different response from a superbike that lives for braking markers.
That's why the same hydraulic family can be tuned for completely different outcomes. The code is the shortcut, but only if you read it as part of the whole system.
How to Tell the Pump Is Actually the Problem
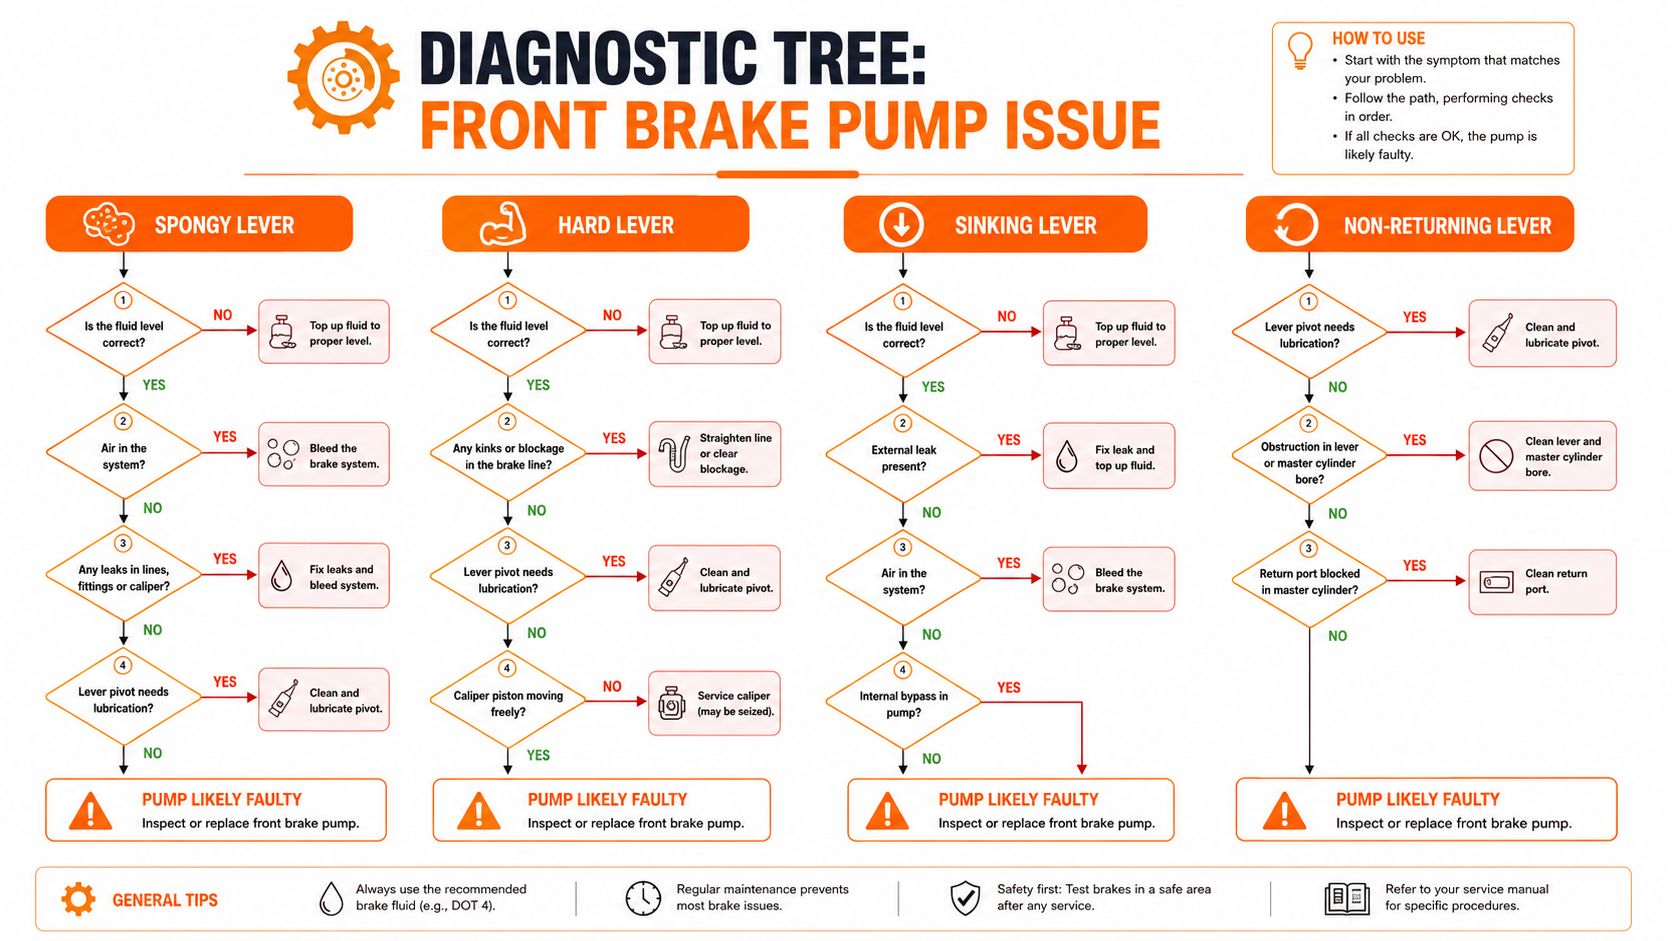
Most bad pump diagnoses collapse as soon as you inspect the rest of the front brake circuit. The cheaper faults are common, and the pump should be the last suspect, not the first.
Start with the symptom, not the part number
A spongy lever often points to air, fluid issues, or hose expansion. A hard lever can mean a hydraulic restriction, pad problem, or caliper issue. A sinking lever at rest is more serious, but even then the source can be the seals, the hose, or a downstream leak. A non-returning lever sometimes turns out to be a lever pivot or pushrod problem, not a destroyed master cylinder.
The order matters. Check the reservoir level and cap seal first. Look at lever free play, brake light switch movement, hose condition, and caliper piston return before condemning the pump. Community troubleshooting threads regularly show riders blaming the pump when the fault is air in the circuit, drag at the caliper, or a hose that's aged out of useful service.
A pump test should come before a pump purchase. If the outlet doesn't move fluid cleanly, don't strip the unit until you know the rest of the circuit is sound.
A real workshop pattern
One of the most common jobs is a rider who insists the pump is gone, then recovers a solid lever after a hose change or a proper bleed. That's not a lucky guess. It's the basic physics of a hydraulic system that can fail at several points.
A clean flow test at the pump outlet tells you a lot before disassembly. If fluid movement is weak or irregular there, the pump starts to look suspicious. If the outlet flow is healthy, the fault is usually downstream, and you've saved yourself an unnecessary master-cylinder rebuild.
For pad and caliper checks, the front-end brake pad reference at this Sixrace front brake pad listing is a useful reminder that the braking system is a package, not one component in isolation.
The working rule is simple. Diagnose the circuit first, then the component. That habit stops bad purchases and usually finds the fault faster than a parts catalogue ever will.
Rebuild or Replace - The Maintenance Economics Question
A front brake pump can be rebuilt, but not every worn unit deserves a seal kit. The right answer depends on what the bore looks like, how the bike has been maintained, and whether the failure is local to the pump or part of a wider fluid problem.
When rebuild makes sense
If the bore is clean, the housing surface is intact, and the fault is clearly seal-related, a rebuild is often the sensible move. Fresh seals and a clean piston can restore normal function when the metal surfaces are still healthy. That's the scenario where the pump failed as a component, not as a victim of neglect.
When replacement is the smarter move
If you see pitting, corrosion, or scoring, replacement is the safer call. Once the bore loses surface finish, new seals won't cure the underlying problem for long. The same is true when the bike has lived on old, contaminated fluid for years. In that case, the pump may be only one damaged part in a broader maintenance problem.
Practical rule: rebuild only when the pump body is still sound. Replace when the bore is damaged, the fluid history is bad, or the failure keeps coming back.
That's where a lot of owners go wrong. They treat the pump as the victim of random bad luck, then ignore the habits that wore it out. Neglected fluid, long service gaps, and harsh usage shorten the life of the seals and can distort the whole repair decision.
A useful parallel comes from Value Tools Co.’s guidance on when to fix power tools. The same logic applies here. Repair the part when the core structure is still healthy. Replace it when the wear has gone past the point where a fresh consumable will hold up.
The front brake pump isn't expensive because of mystery. It's expensive because a bad decision here affects confidence at the lever. A rebuild that only masks corrosion wastes time and often sends the rider straight back to the garage.
An Overview of the Bleed Procedure
A proper bleed should leave the lever firm, consistent, and repeatable. If it doesn't, the bleed wasn't clean enough, or the pump and seals still can't hold pressure.
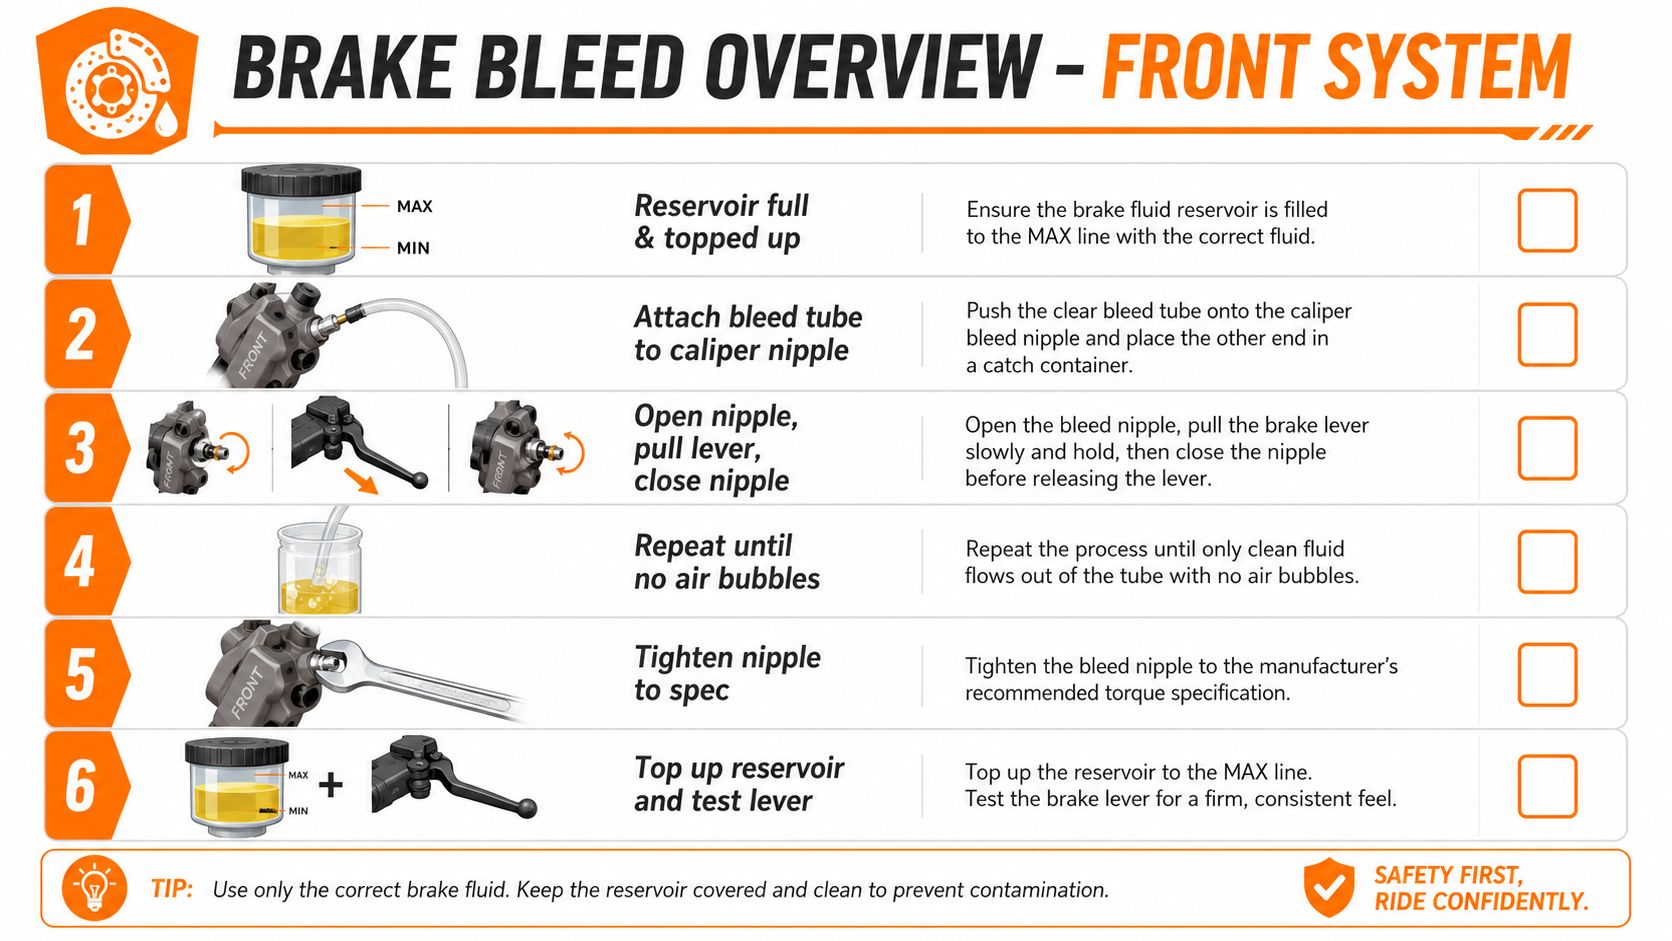
The sequence that matters
Start with the reservoir full and keep it topped up through the job. Work at the caliper bleed nipple, use a manual or vacuum method, close the nipple before the lever is released, then repeat until the lever clears up. Finish by topping off the reservoir and checking lever feel again.
- Keep the reservoir full: running it dry just pulls more air into the circuit.
- Seal the cap properly: a loose cap can ruin a clean bleed and contaminate the fluid path.
- Work level if you can: bleeding on a steep slope makes air pockets harder to chase.
- Watch the lever return: if it doesn't recover properly, don't assume the bleed fixed the root cause.
The Trackside Careers race mechanic advice is useful in the same way a good workshop habit is useful. The job is not just pumping fluid through a line. It's controlling the sequence so you don't chase air around the system.
A clean bleed that still leaves a weak lever is a diagnostic clue. If the procedure was done correctly and the feel doesn't change, you're probably looking at a pump seal issue, an internal bypass, or another fault in the hydraulic circuit. At that point, more bleeding won't rescue the feel.
For the fluid side, the Sixrace motorcycle brake oil listing fits the same maintenance logic. Fresh fluid matters because old fluid turns a simple bleed into a repeat job.
Choosing the Right Pump on Sixrace
A front brake pump is worth buying only after the fitment checks are done. Brand comes after that. Shop by looks alone, and you end up with a master cylinder that misses the motorcycle, the lever geometry, or the way the bike is used.
Use the filter order that prevents mistakes
Start with the make, model, and year. Then compare the OEM master-cylinder reference with the compatible codes on the product page. Only then decide whether the bike needs an OEM-equivalent replacement or a performance-oriented aftermarket option. If you are comparing upgrade paths, the practical buying flow is laid out in this master-cylinder upgrade guide.
Sixrace's catalogue is organized around model and year compatibility, and that is the correct way to sell this kind of part. The BMW F 900 R 2020+ Evotech-performance protection and lever-related listing shows that clearly, with fitment tied to the bike family and year range instead of a generic one-size-fits-all label.
Match the part to the use case
A road bike needs a response that stays manageable and a lever feel that does not get tiring in traffic. A machine used for track days or hard canyon riding can justify a stiffer, more direct setup. Brembo, Evotech-compatible parts, and other performance brands all belong in that decision tree as options, not as automatic upgrades.
Buying rule: compatibility first, code second, brand third. If the first two do not line up, the rest does not matter.
The Sixrace catalogue is useful because it lets you filter by model family before you commit to a pump or lever choice. That is the right workflow for a hydraulic part, because feel and fit are both tied to the motorcycle itself.
Frequently Asked Questions for Riders and Mechanics
How do I choose between 18/18 and 18/20 for mixed road and occasional track use?
Pick 18/20 if the bike spends most of its life on the road and you want a more progressive lever that's easier to modulate in traffic and on imperfect surfaces. Pick 18/18 if track days are the priority and you want a quicker, firmer response with less lever travel. The code follows the riding style, not the other way around.
Does an aftermarket radial pump void OEM warranty?
Not automatically, but a non-OEM part can complicate a warranty discussion if the brake issue is tied to the modification. The safe approach is to keep the original parts, confirm fitment carefully, and know that the burden shifts if the aftermarket part changes the brake system's behavior. The pump choice should never be casual on a road bike still under warranty.
When is a sinking lever at rest a clear pump failure?
When the lever slowly drops with steady pressure and the rest of the circuit has already been checked, the pump becomes the prime suspect. If the hose, caliper, and lever pivot are sound, a seal bypass inside the master cylinder is the next logical explanation. A sinking lever that returns only after release and re-pull usually points to an internal hydraulic problem, not a simple bleed issue.
What's the fastest bleed-versus-replace decision?
If a careful bleed restores lever feel, keep the pump. If the bleed is clean and the lever still sinks, bypasses, or won't return properly, move to inspection or replacement. Don't keep bleeding a system that's already telling you the master cylinder can't hold pressure.
What's the single habit that saves the most money?
Confirm the system before you condemn the component. Run the four checks, reservoir, hose, caliper, lever, then decide whether the front brake pump is at fault. That one habit stops a lot of unnecessary parts orders.
If you're sorting a front brake issue, start with the fitment and the fault, not the guess. Browse Sixrace for model-specific brake parts, check the compatibility by year and code, and use the catalogue the way a mechanic uses a bench test, as confirmation, not assumption.
 Italiano
 Deutsch
 Français
 Español
 English
 Polski